

Create a billing alert to avoid surprise bills

Christophe January 30, 2023
Why is this lesson here?
Some learners think this lesson means you’ll be charged extra to go through the course. That’s not the case, so I wanted to clarify:
Any time you see one of our 1-click deploy Hands-On Labs in the course (they look like the screenshot below and are usually labeled [LAB] in the syllabus), these will deploy in our AWS accounts, where you can launch resources within AWS without worrying about any of the costs.
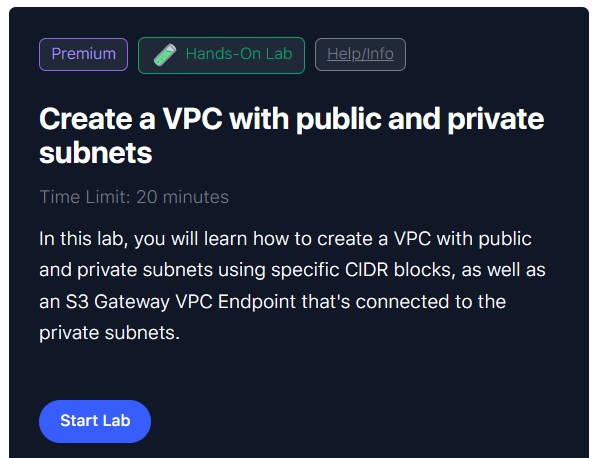
The [DEMO] lessons without 1-click deploy labs can be completed in your own account if you want to, but that’s completely optional! Some like following along in their own accounts for the experience, while others prefer watching the video demo without following along.
Either way, I include this lesson because creating a billing alert is one of the first things you should do whenever you set up an AWS account, whether it’s personal or for a business. It helps ensure you’re never surprised by unexpected charges in the future, even outside this course. It costs $0 to do, takes less than 10 minutes, and gives you peace of mind, so I highly recommend it to everyone!
But again to be clear: you can complete this entire course without launching a single resource in your own AWS account if you prefer!
Alright, let’s get into it.
Details 👨🔬
- Length of time: < 10 minutes
- Cost: $0.00
- Difficulty: Easy
Before you complete any of our labs in this course, we highly recommend that you spend a few minutes going through this lab because it will teach you how to configure billing monitoring and alerting to notify you if your AWS bill ever exceeds what you expect to pay.
Some of our labs are free, while others can cost some amount of money. This will be clearly noted in each lab before you start so that there are no surprises and you can choose to skip the labs that cost money if you want.
With that said, sometimes, resources can continue to cost you money if you forget to turn them off or delete them, in which case you could end up with a surprise bill. These are the scary stories you’ve heard about on social media in regards to the cloud. This lab is designed specifically to help prevent that.
For example, if you are OK with spending up to $5.00 on labs for this course, then you could set an alert that notifies you when you reach $5.00, or when you get close to that (say $4.00) that way you can investigate and see if something was left running before you exceed $5.00. This is just an example number, and you can select whatever dollar value you’re comfortable with.
Let’s get started by following the below steps.
Enable Budgets (new and best way)
AWS has made it easier than ever to enable budgets that will notify you if your costs either exceed your set budget, or are estimated to exceed your budget.
You can create different kinds of budgets, like:
- Zero spend budget – create a budget that notifies once your spending exceed $0.01
- Monthly cost budget – create a budget that notifies if you exceed or are forecasted to exceed the budget amount, each month
There are a couple of other options but those are the two I would recommend for this course.
To enable, search for and click on “Budgets.”

You’ll then be able to select what kind of budget you want, and how you want to configure it:

These are my recommended settings, but if you don’t want to spend any money at all you would select a different option, or if you are OK with spending more than $30, you can increase the “Enter your budgeted amount ($)” value.
Then click on “Create budget” and you’re good to go!
Enable billing alerts (old and supplemental way)
This is how we used to create budget alarms before Budgets were an available feature in AWS. Feel free to still go through these steps if you’d like to learn about CloudWatch billing alerts — but this is optional.
- Log into your AWS account
- Pull up the billing dashboard (you can search for “billing”)
- Click on Billing Preferences in the left-bar menu
- Enable “Receive CloudWatch billing alerts”
- Save changes

Creating an alarm
- Search for the service “CloudWatch” and click on it
- Make sure your region is set to “N. Virginia” (billing metrics are stored in this region, so this is necessary)
- Click on “All alarms” in the left-bar menu
- Click on “Create alarm”
- Click on “Select metric”
- You should see a “Billing” option under “Metrics” but if you don’t, you can search for it in the search bar below “Metrics”
- Select “Total Estimated Charge”
- Select the row with the metric name “EstimatedCharges” and then click on “Select metric” in the bottom right
- Choose “Maximum” for the “Statistic” option if it’s not already
- You can keep the “Period” at “6 hours”
- For the “Threshold type” under “Conditions” you will want to select “Static”
- For the “Whenever EstimatedCharges is…” option, you can select whatever you’d like between Greater and Greater/Equal
- If you want to get notified when charges reach or exceed $5.00, then you would select “Greater/Equal”
- If you want to get notified when charges exceed $5.00, then you would select “Greater”
- Set your dollar value in the “than…” input box
- Expand the “Additional configuration” and make sure that you see:
- “Datapoints to alarm” “1 out of 1”
- “Missing data treatment” set to “Treat missing data as missing”
- Click on “Next”
- Under notification, make sure it’s set to “In alarm” and “Create new topic” for the SNS topic
- You can leave the default topic name if you’d like, then add your preferred email to receive the notification (you can add multiple emails)
- Click on “Create Topic”
- You should receive an email shortly after from “AWS Notification – Subscription Confirmation” → you will need to click on “Confirm subscription” which is their way of preventing spam.
- You should see a page that says “Subscription confirmed!”
- (If you don’t have the email yet, wait a few minutes and check you didn’t misspell the email or check your spam folder)
- Back to the AWS console, you can click on “Next”
- You can now name it something like “Billing threshold alarm” and you don’t have to put in a description
- Review your settings to make sure they look right, then “Create alarm”


You will now see your brand-new alarm. Initially, it will say that the state is “insufficient data” but give it a minute or two, and it will change to “OK.” If you don’t see it after a couple of minutes, you can refresh the page.
Now that you have a billing alert, you will get notified based on the dollar value you set, and based on whether you set it to greater or greater than/equal to.
Reviewing your costs
Of course, you don’t have to wait for an alarm to come through to check on how much you’re spending in AWS. You can go back to the Billing dashboard and you will see a summary on the main dashboard. It will show you:
- Current month’s total forecast
- Current MTD (Month-to-date) balance
- Prior month for the same period with trend
You can also see additional breakdowns further down on this page, or in the “Cost explorer.” Feel free to check that out if you’re interested, but otherwise, let’s complete this lab!
If you have any issues with this lab, please comment below and we’ll take a look!
Hello, I am stacked at step 6, search for bill indicates:
Your search – billing – did not match any metrics.
Tips:
Tags such as EC2 instance name tags are not supported in metric search.
Make sure that all words are spelled correctly.
Try different keywords.
Try fewer keywords.
It can sometimes take a few minutes for metrics to show up after having created them, so that might be why. If you check again now and still don’t see it, try to go back through the steps from the start, and let me know if the issue persists!
Will this be the same as setting up AWS Cost Management on your account? because i can’t still get through step 6.
I just double checked and it looks like AWS changed the user interface a little bit for enabling billing alerts. I’ve updated the steps above with a screenshot to show what needs to be enabled. Make sure you pull up the “Billing” dashboard, then click on “Billing Preferences” and then enable “Receive CloudWatch billing alerts.” Also make sure you are in the us-east-1 N. Virginia region. As long as you do that, you should see the Billing metric. This is something everyone has access to in AWS so we need to make sure this works for you!
Thank you Christophe, i will work on this and let you know the outcome.
Same here, also stuck on step 6 “Your search – Billing – did not match any metrics.
Tips:
Tags such as EC2 instance name tags are not supported in metric search.
Make sure that all words are spelled correctly.
Try different keywords.
Try fewer keywords.”
never mind. I missed the step “Enable “Receive CloudWatch billing alerts” , once I enabled, I created my alert. Thanks
Thanks for the update & nice work troubleshooting the issue!